To setup development environment in windows machine for android, follow the below steps -
- Install Java version 1.5 or above .
- Download Android-sdk_rXX-windows.zip from http://developer.android.com/sdk/index.html
- Extract Android-sdk_rXX-windows.zip into C:\Android or your favorite folder on your local drive.
- Append “C:\Android\android-sdk-windows\tools” to PATH environment variable value as shown below.
- Install Eclipse - Europa, GyneMede, Galileo etc. [Note: From here on, we will be presenting the slide sequence as in Eclipse Galileo.]
- Start Eclipse.
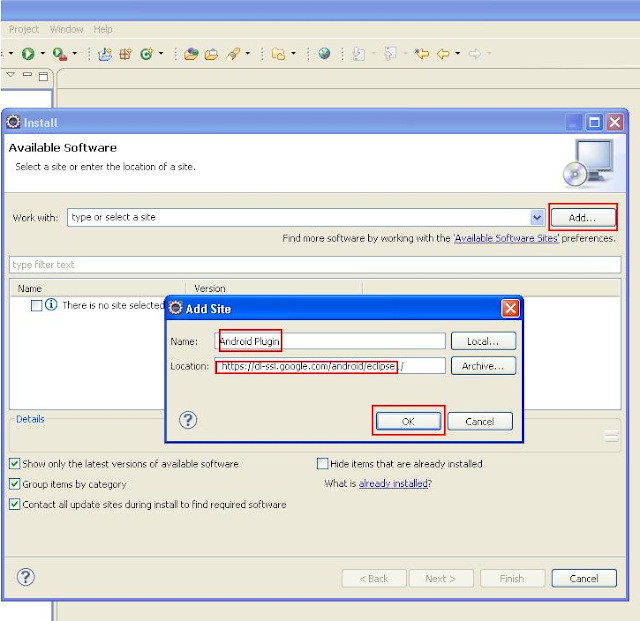
- Go to Help ->Install New Software- >Click on Add Button ->”Add Site” box will open.
- In Name text box type “Android Plugin” and in Location (URL) text box type “https://dl-ssl.google.com/android/eclipse/” .Click OK and then Finish.
- In Install box, you will see list of “All Available software” “Work with” drop down. Select “Android PlugIn - https://dl-ssl.google.com/android/eclipse/”.
- In “Name” box , you will see check box “Developer Tools” (On clicking +, Android DDMS and Android Toc along with version should be visible). Select all and click finish.
- Installation will take some time. To check if Android is installed correctly go to Window->Preferences ->Install/Update->Available Software sites. “Android PlugIn - https://dl-ssl.google.com/android/eclipse/” Should be visible under “Name” and “Location” section. You can also check from command prompt using the command – “Android”.
- Select Window ->“Android SDK and ADV Manager”, A dialogue box will open with three Options on left hand side:
- Virtual Devices
- Installed Packages
- Available Packages
- Select “Available Packages”, Expand “+” icon, choose “SDK Platform 2.1, API 7, revision 1”. [Note: Please do not select all SDK versions available since it will take too much time to download.]
- Select “Virtual Devices” and click on “New” button on right hand side.
- “Create new AVD Manager” box will open. In “Name” text box, enter appropriate name for e.g. “AVD”. In Target drop down select “Android 2.1 – API Level 7”and click on “Create AVD” Button.
- And it’s all done. You are ready to create “Android Application” as a normal Java Program.
****** Send me email if you have any queries regarding this post *********


No comments:
Post a Comment