Monday, November 21, 2011

Avoid Cross Site Scripting popup in IE


Avoid Cross Site Scripting popup in IE

Microsoft IE has a security feature called, Cross Site Scripting (XSS) Filter, in which IE doesn't allow cross site script to run and help to prevent cross site attack. To avoid this popup there is a setting in IE which is enable by default. To disable this popup, follow the below steps - 

  • Goto Tools-->Internet Option.
  • Click on the Security Tab
  • Click on Custom Level Button
  • Scroll down till the end and look for "Enable XSS Filter" setting.
  • Select "Disabled" and click on OK
  • Restart your browser and you will not see any cross site script popup.
The above approach will not work if you have huge number of clients and asking all of them to follow the above steps will be tedious for them. There is a way to handle this from application front. 

IE browser read the "X-XSS-Protection" header, and if the value of this header is set to 0, IE doesn't show the cross site script popup.

To set this in java, you can set the header in response object as given below - 

response.setHeader("X-XSS-protection", 0);

You can set the same header in any language before sending response to client and browser will respect this header.
How to Make configuration changes in apk file 


Decompile apk, make changes, compile and create apk.

Android puts all the resources in binary format under the apk file, and cannot be read by unpacking the apk file. It needs tool to unzip/decompile so that we can read it and if required, we can make some configuration changes and again create the apk with those changes.

In my example, I am updating the VersionName in AndroidManifest.xml file.

Need to follow the below steps - 

  • Setup the apkTool -
    • Download apktool-install-windows-* and apktool* file from http://code.google.com/p/android-apktool/ link.
    • Unpack both these downloaded files into some directory into your local machine (we will refer this location as root directory in our below examples).
    • If you want to use this frequently, set this path into your environment variable, this is not mandatory step.
  • Open command prompt and go to your root path.
  • To decompile your apk, use below command - 
    • apktool d ApkToolTest.apk
Note: Here I have ApkToolTest.apk file which I have created to demo this and copied that apk file into root directory.
Once you run the above command you will see the output like this -

I: Baksmaling...
I: Loading resource table...
I: Loaded.
I: Loading resource table from file: C:\Users\raghvendra\apktool\framework\1.apk
I: Loaded.
I: Decoding file-resources...
I: Decoding values*/* XMLs...
I: Done.
I: Copying assets and libs...

Once this is done, you will see ApkToolTest folder in root directory, with all the resources. 
  • Make the changes into any of the configuration file, In my case, I made the changes in AndroidManifest.xml file and updated the VersionName field.
  • Once you done with all your changes, run the below command to again compile the project and create the apk file again - 
    • apktool b ApkToolTest
The above command will output like below -

I: Checking whether sources has changed...
I: Smaling...
I: Checking whether resources has changed...
I: Building resources...
I: Building apk file...

  • Once that's done you will find the ApkToolTest.apk file having updated resources information You can find the updated apk under dist folder, In my case it is \ApkToolTest\dist\ApkToolTest.apk. You can deploy this updated apk file to any devices, or Market, or any app store.
  • Once you try to install this app onto emulator or any device before releasing to any of the public use, and if you see "INSTALL_PARSE_FAILED_NO_CERTIFICATES" error, then you have to sign your apk. To sign apk follow the below steps - 

Tuesday, November 15, 2011

How to setup Android Development Environment on Mac


Setting up the develop environment for Android is little tricky in MAC OS. To setup development environment in Mac OS for android, follow the below steps -


Android SDK installation:

  • First need to download the Android SDK from http://developer.android.com/sdk/index.html. [Note: download the MAC OS sdk from the list.]
  • Unzip the downloaded sdk and copy this in some location into your local drive. I am copying into /Applications, so my path will become "/Applications/android-sdk-macosx/".
  • Add the JAVA_HOME, ANDROID_SDK, PATH, and NO_NEON into .bashrc file. To add these entry into your .bashrc file follow the below steps:
    • First check if the file is exists, open Terminal.app (in Applications/Utilities) and type "ls -a ~/" This will list all of the file in your home directory. If .bashrc exists, then you can edit the file by typing "open -a /Applications/TextEdit.app .bashrc".
    • If the file doesn't exist, then open TextEdit, select Format=>Make Plain Text, then paste in the necessary commands. Once that's done, go to File=>Save As, uncheck "If no extension is provided, use ".txt", type in the name ".bashrc", and save the file. TextEdit will warn you that files beginning with a "." are reserved for the system. Click the "Use '.'" button. Note: Remember to save this on your home location. 
    • Add Following entries into your .bashrc file -

                     export JAVA_HOME=/System/Library/Frameworks/JavaVM.framework/Home
                     export ANDROID_SDK=/Applications/android-sdk-macosx/
                     export PATH=$PATH:$ANDROID_SDK/tools:$ANDROID_SDK/platform-tools
                     export NO_NEON=1

    • Details about above configuration -
      • Some Mac OS comes with the 64bit version of Java 1.6 installed by default. so we are setting the JAVA_HOME to point at it.
      • The PATH is not required alias but will make it easy for you to run the Android SDK Manager by typing “android” or the Android Debug Bridge by typing “adb” in the Terminal.
      • Set NO_NEON to prevent Android compilation from using the Neon CPU enhancements which are not supported on all Android devices (including the Emulator).
  • Run Android SDK manager to install support for one or more Android OS platform versions. [Not mandatory to install all versions, but at least one version will require to proceed with the further steps.] To install run the $ANDROID_SDK/tools/android command and select at least one sdk and API version. It might take some time depending upon your selection.

Android NDK installation:

          The Android NDK is a toolset that lets you embed components that make use of native code in your Android applications.
  • Download Android NDK from http://developer.android.com/sdk/ndk/index.html. [Note: Download the MAC OS version from the list]
  • Unzip the downloaded ndk and copy this into some location into your local drive. I am copying into /Applications, so my path will be "/Applications/android-ndk-r7".
  • Add below entries into your .bashrc file - 
          export ANDROID_NDK=/Applications/android-ndk-r7
          export PATH=$PATH:$ANDROID_NDK:$ANDROID_NDK/tool

Android Eclipse Plugin installation (ADT):
  • Start Eclipse.
  • Click on Help-->Install New Software.
  • Put https://dl-ssl.google.com/android/eclipse/” into the “Work with:” field.
  • Press Enter, check the below table will populate automatically with the options.
  • Check the Developer Tool check box to select all.
  • Click Next, Next and select the Accept agreement And Finish.
  • Once it will finish the installation, It will ask you for the restart, so click on Restart Now to restart eclipse.
Android Eclipse Plugin Configuration (ADT):

         Once Eclipse restarted, We need to configure the installed ADT plugin.
  • Goto Eclipse-->Preferences menu.
  • Select Android from the left side list.
  • Put your $ANDROID_SDK location into SDK Location field. In my case it's "/Applications/android-sdk-macosx"
  • Click on Apply button and you will see all the android platform versions which you had installed before.
  • Hit OK, and now your Android development environment is all setup correctly. 
********** Create Hello world app to start with ***************


Monday, November 14, 2011

How to setup Android Development Environment on Windows


To setup development environment in windows machine for android, follow the below steps -

  • Install Java version 1.5 or above .
  • Download Android-sdk_rXX-windows.zip from http://developer.android.com/sdk/index.html
  • Extract Android-sdk_rXX-windows.zip into C:\Android or your favorite folder on your local drive.
  • Append “C:\Android\android-sdk-windows\tools” to PATH environment variable value as shown below.


  • Install Eclipse - Europa, GyneMede, Galileo etc. [Note: From here on, we will be presenting the slide sequence as in Eclipse Galileo.]
  • Start Eclipse.
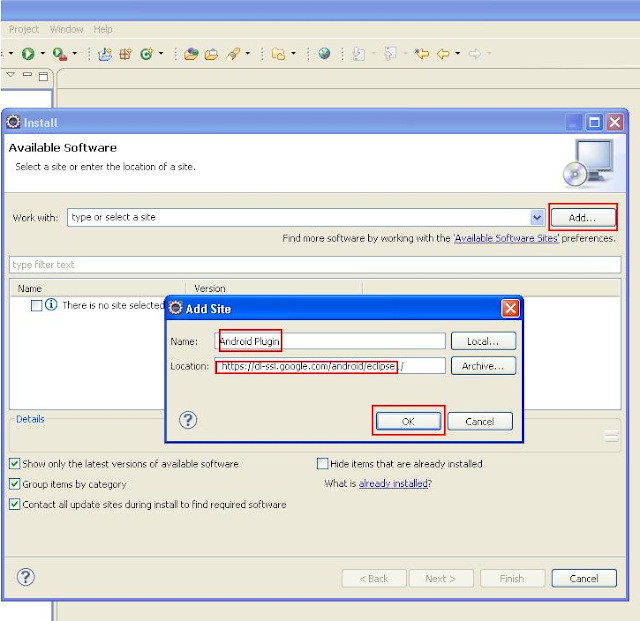
  • Go to Help ->Install New Software- >Click on Add Button ->”Add Site” box will open.
  • In Name text box type “Android Plugin” and in Location (URL) text box type “https://dl-ssl.google.com/android/eclipse/” .Click OK and then Finish.


  • In Install box, you will see list of “All Available software” “Work with” drop down. Select “Android PlugIn - https://dl-ssl.google.com/android/eclipse/”.

  • In “Name” box , you will see check box “Developer Tools” (On clicking +, Android DDMS and Android Toc along with version should be visible). Select all and click finish.


  • Installation will take some time. To check if Android is installed correctly go to Window->Preferences ->Install/Update->Available Software sites. “Android PlugIn - https://dl-ssl.google.com/android/eclipse/” Should be visible under “Name” and “Location” section. You can also check from command prompt using the command – “Android”.


  • Select Window ->“Android SDK and ADV Manager”, A dialogue box will open with three Options on left hand side:
    • Virtual Devices
    • Installed Packages
    • Available Packages


  • Select “Available Packages”, Expand “+” icon, choose “SDK Platform 2.1, API 7, revision 1”. [Note: Please do not select all SDK versions available since it will take too much time to download.]
  • Select “Virtual Devices” and click on “New” button on right hand side.
  • “Create new AVD Manager” box will open. In “Name” text box, enter appropriate name for e.g. “AVD”. In Target drop down select “Android 2.1 – API Level 7”and click on “Create AVD” Button.

  • And it’s all done. You are ready to create “Android Application” as a normal Java Program.

****** Send me email if you have any queries regarding this post *********